Quick Start Guide
Welcome to GoFish! We're excited to help you find and manage your leads. This guide will get you started in just a few simple steps.
Last updated 11 months ago
👋To get the most out of this guide, please confirm you've completed these quick steps:
Account Created: You've successfully signed up and have an active organization.
Email Verified: Your email address is confirmed.
Active Subscription: Your subscription is all set.
Step 1: Your Organization Home Page
Once you've signed up and verified your email, you'll be redirected to the Deal Flow page.
The Deal Flow page is your command center for interacting with and viewing all your deal opportunities. Here's a breakdown of what you can do:
Opportunity Interaction: Engage directly with your opportunities.
View Facility Specific Data: View the available data for that opportunity.
Set Follow-Up Reminders: Never miss a beat by scheduling owner contact reminders.
Store Important Files: Keep all essential documents, like LOIs and offering documents, organized in one place.
Manage Opportunity Statuses: Update the status of your opportunities to organize your deal pipeline.
Record Interactions: Use the note section to log all your conversations and interactions with owners.
Access Skip Trace Data: For users on our on the Plus tier and up, skip trace data is readily available here.
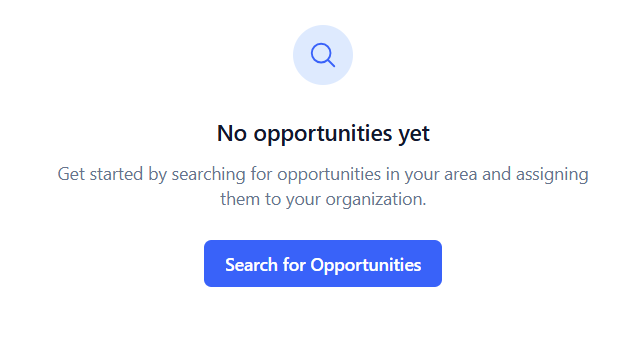
First-Time Setup: Importing Your Leads
If this is a brand new account, this area will have no leads and there will be a message informing you to add opportunities. To import your leads please head to the Search tool.
Step 2: Selecting Your Opportunities
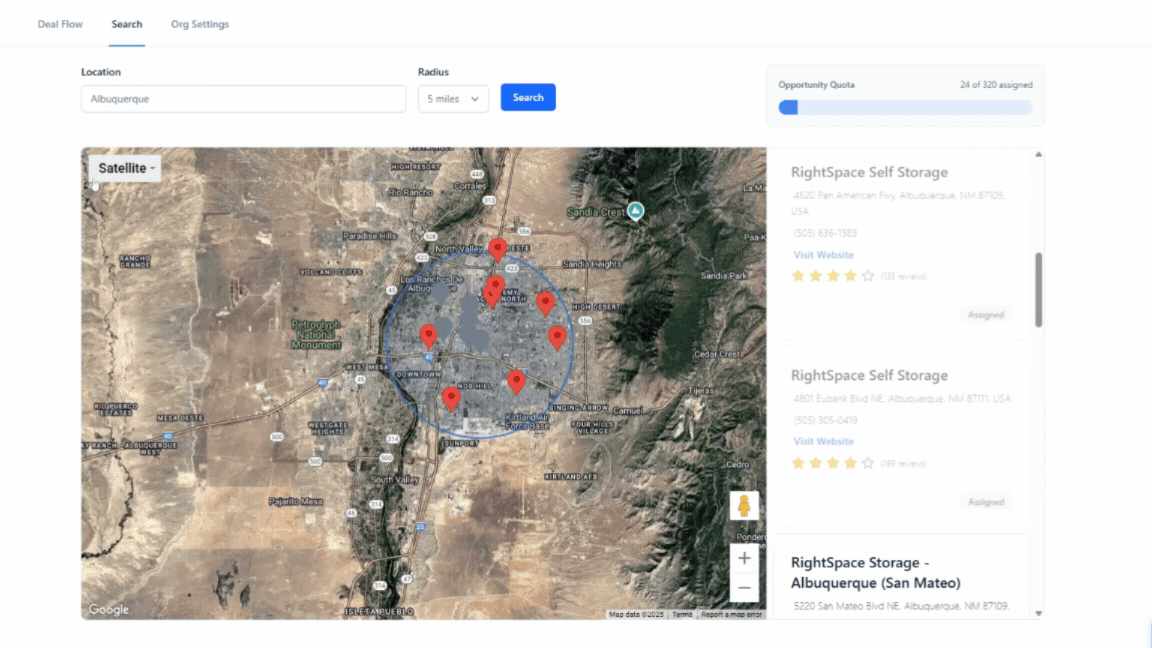
Your next stop is the Search tool. Here, you can easily find and select the opportunities that are most relevant to your needs.
Navigate to the Search tab.
Enter the part of the country that you want to search leads in the Location field (e.g. Albuquerque, NM)
Select the Radius (e.g. 5 mile, 3 mile, 1 mile)
Click Search
Assign the opportunities by clicking the “Assign” button for each search result on the right hand side of the screen.
These opportunities selected will automatically populate in your Deal Flow page with the status of “New”.
👨💻 Note: Each opportunity assigned is tallied in the top right part of the page. Here you can keep track of your monthly budget of opportunities for your tier.
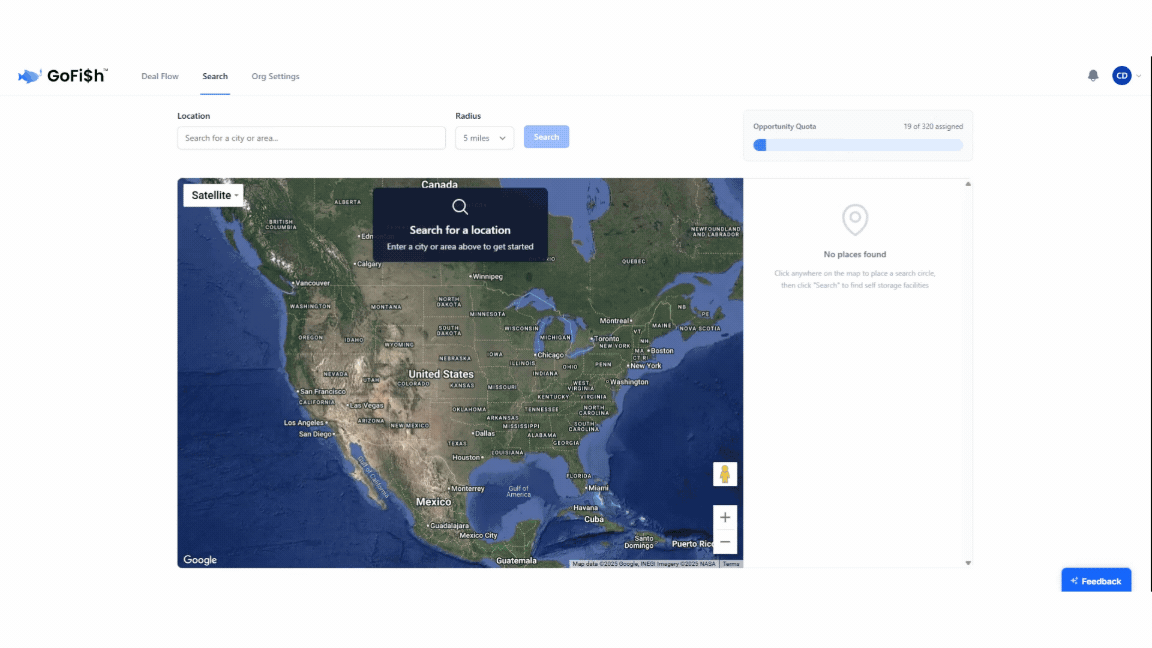
👨💻 Tip: You can enter street view with the plug-in by using the little yellow person in the map (Just like in Google Maps)
Need More Opportunities?
If you've assigned all opportunities within your current search area, simply:
Search a new area, or Move the search circle by clicking a different part of the map.
Click "Search" to load more opportunities.
Step 3: Interact and Manage Leads
With your leads assigned, you can now engage with them and track your progress. The Deal Flow page has two key sections to help you manage your opportunities: Filters and the Opportunity Cards.
Filters Area

The filters area helps you quickly narrow down your opportunities. You'll find:
Quick Filters: These buttons instantly change the opportunities you see below.
All: Displays every opportunity regardless of status.
Follow Up: Shows facilities you've set reminders for, ordered by time.
Interested: Filters for opportunities you've marked as "Interested."
Offer Made: Displays opportunities where you've made an offer.
Interested Later: Shows opportunities you've marked for future follow-up.
No Answer: Filters for opportunities where you haven't received an answer.
Trophies: View your "favorited" or "trophy" assets.
Search Field: Quickly find facilities by name.
Status Field: Filter by statuses not covered in the quick buttons.
Displays all status possibilities that you can filter on
Note: We recommend using this filter only when the “All” button/filter is selected, otherwise it will combine with another filter that you may not intend to use.
State Field: Narrow down opportunities by their state.
Order By: Sort your opportunities by various criteria like facility name, date added, etc..
Opportunity Cards
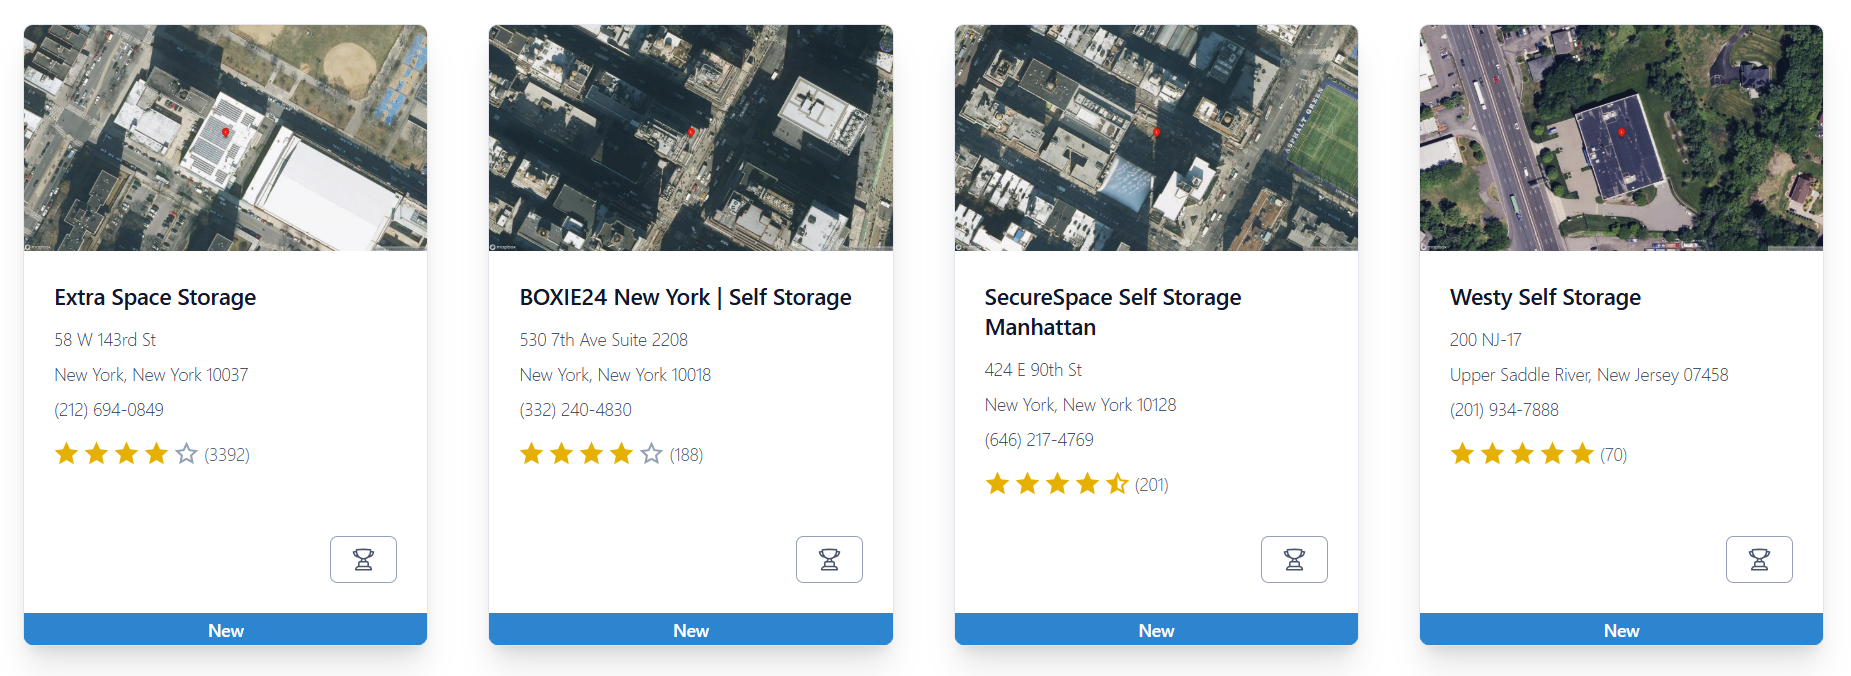
Each Opportunity Card provides a snapshot of facility-level information. On these cards, you can see the:
Facility Info: name, address, number of stars, number of reviews, and phone number as listed on Google
Favorite an Opportunity: Click the trophy icon to mark an opportunity as a favorite.
Opportunity Status: On the bottom of the card, you can see the current status you have set it to (The default status is “New” after you have freshly assigned a lead from the search tool).
When you click into an individual opportunity card, you'll find even more details and actions:
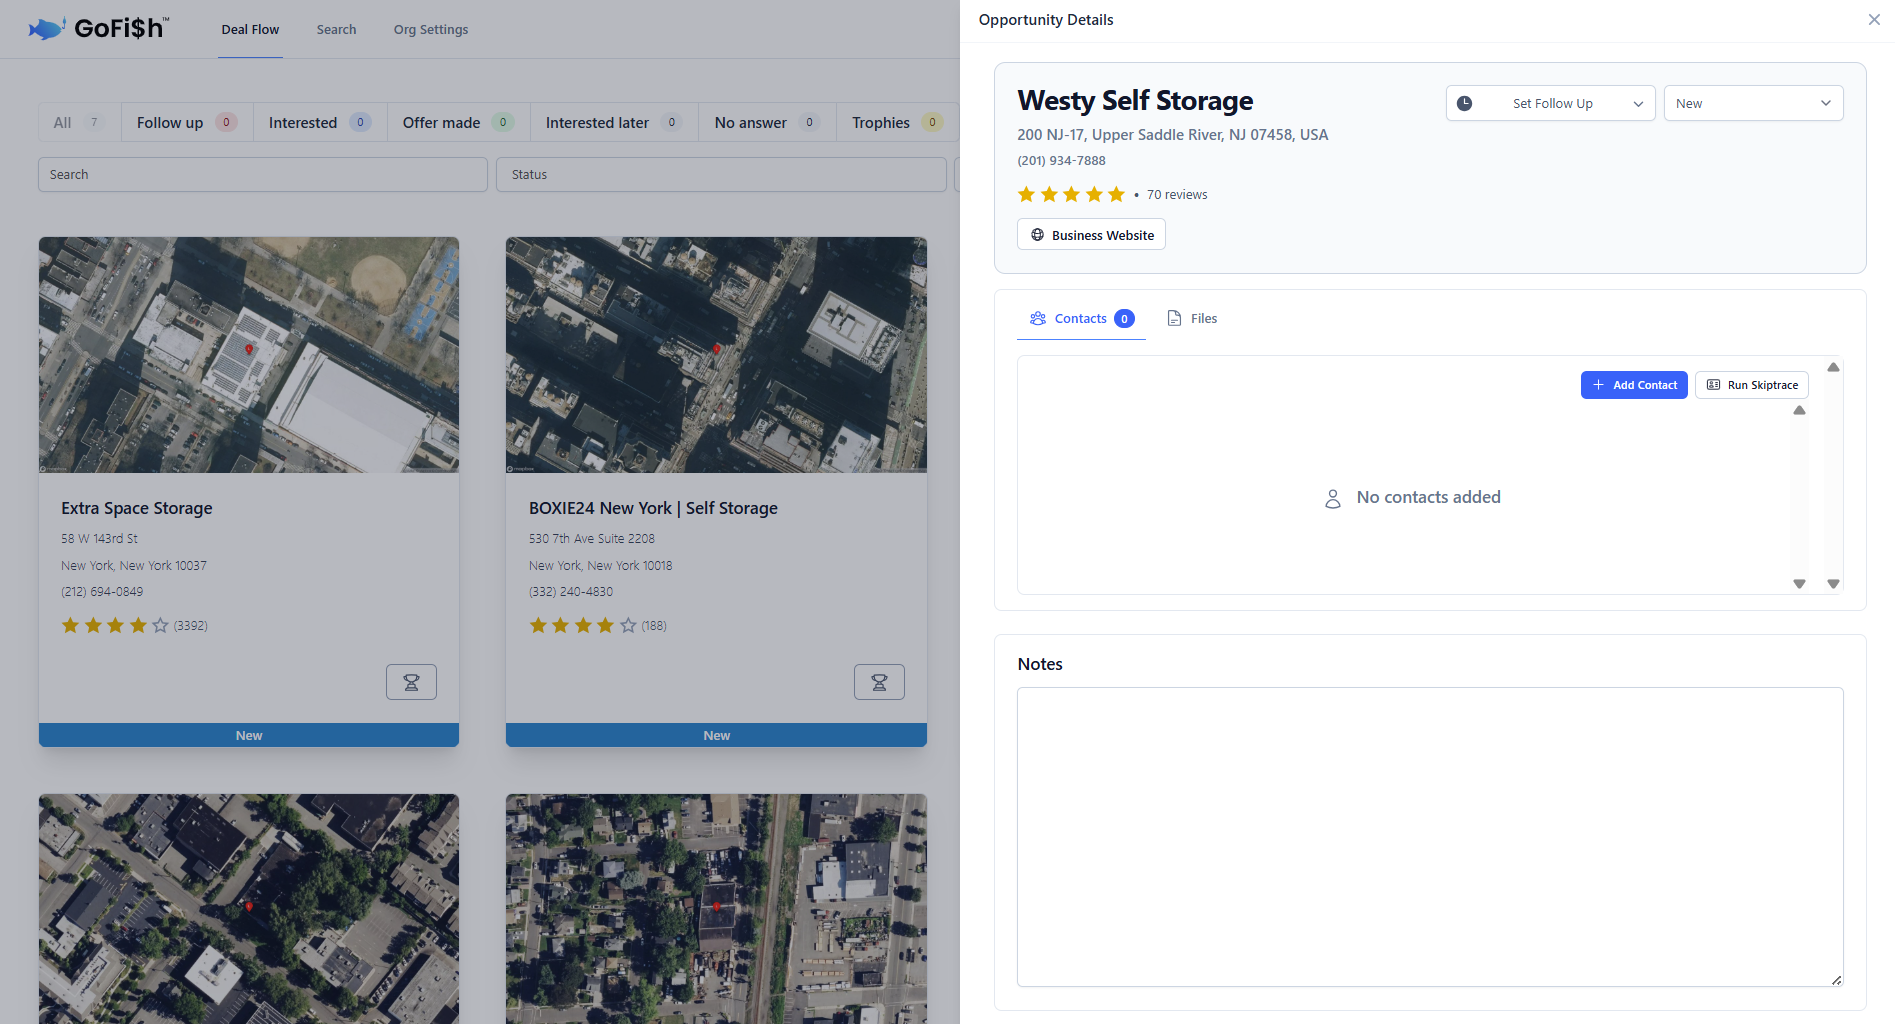
Change Status: Update the opportunity's status using a dropdown menu.
Set Follow-Up Reminders: Follow-ups for you to call the owner.
Skip Traced Owner Info: (Plus tier and above) Access valuable owner information.
Add Additional Contacts: Click the “Add Contact” button to add in additional contacts
Upload Files: Click the “Files” tab next to the “Contacts” tab and add relevant documents like Letters of Intent (LOI) or other offering documents.
Notes Section: Record your conversations with owners and make general comments about the facility.
For assistance with your Org Settings please see our article on Managing Your Account & Settings
That's it! You're now all set with your account with GoFish. If you have any questions, our support team is always here to help (support@gofishleads.com).